
JioAdMaker - Admin Portal
Built a portal that not only streamlines the creation and management of templates but also independently manage ad campaign templates, schedule and approve campaigns templates, and oversee live campaign template deployments for the 1Mn+ JioFiber POS channel partners.
Type
UX Design
Client
JioFiber
Collaborators
1 PM, 1 PD
Project Duration
~1 Month
Problem Statement
Problem Statement
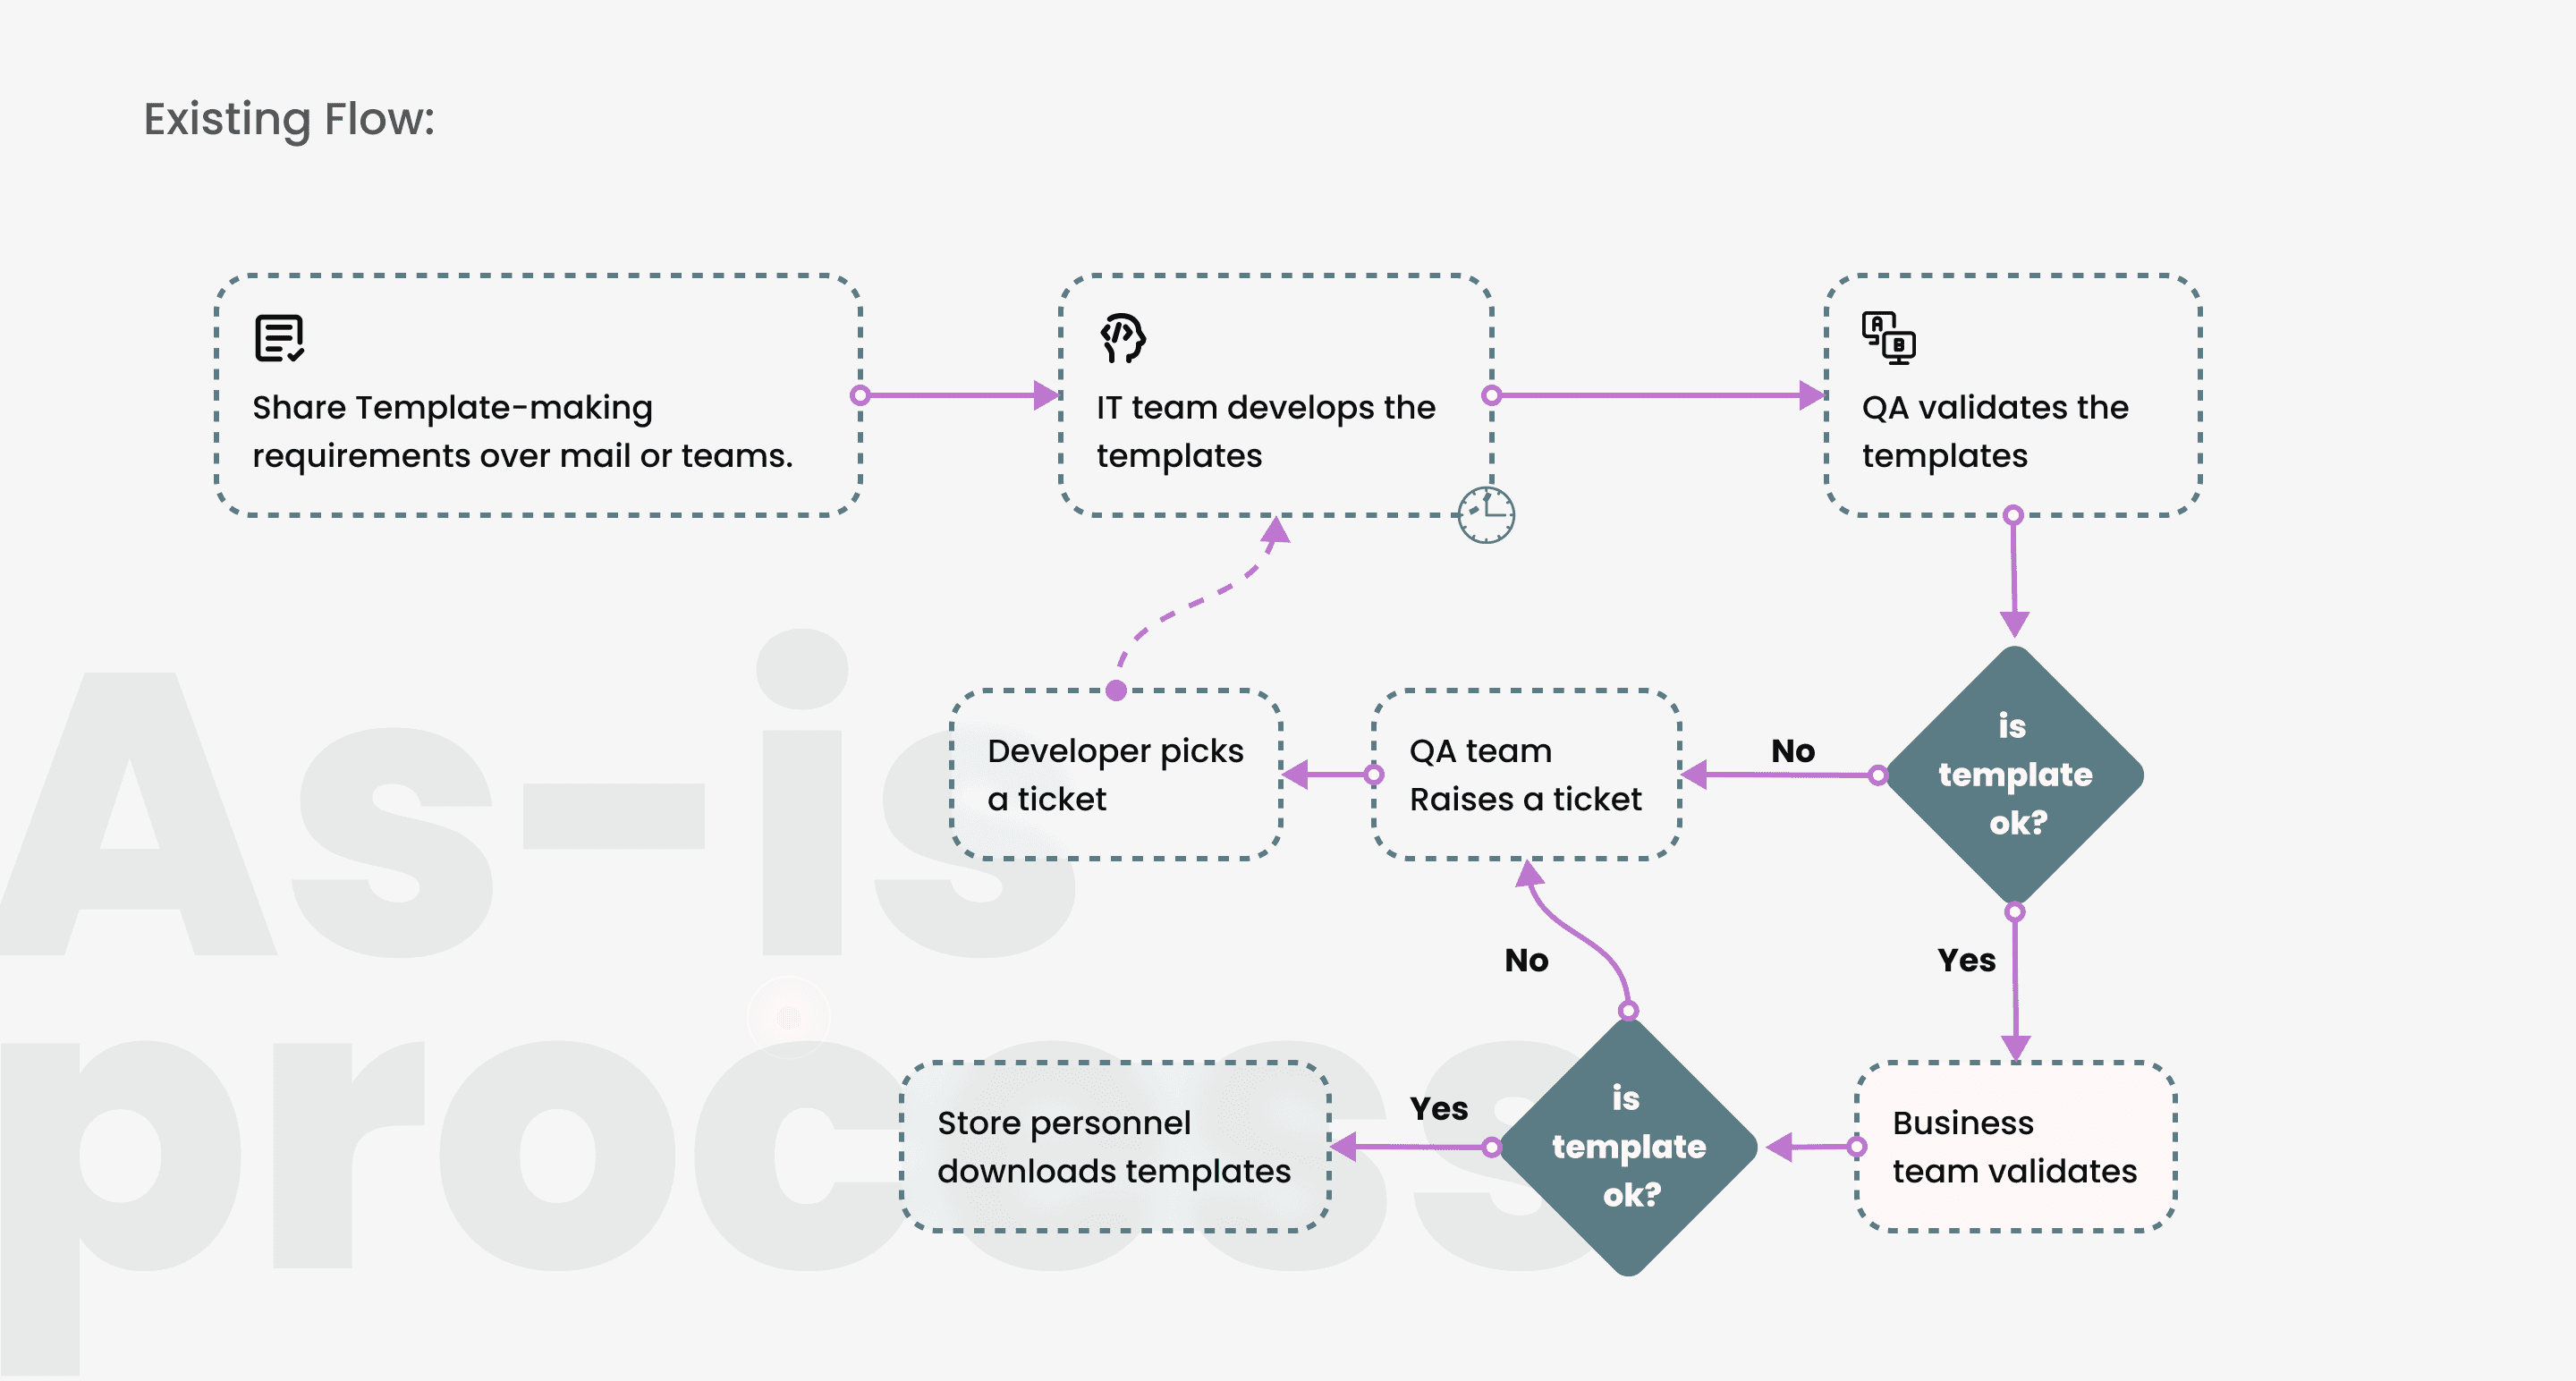
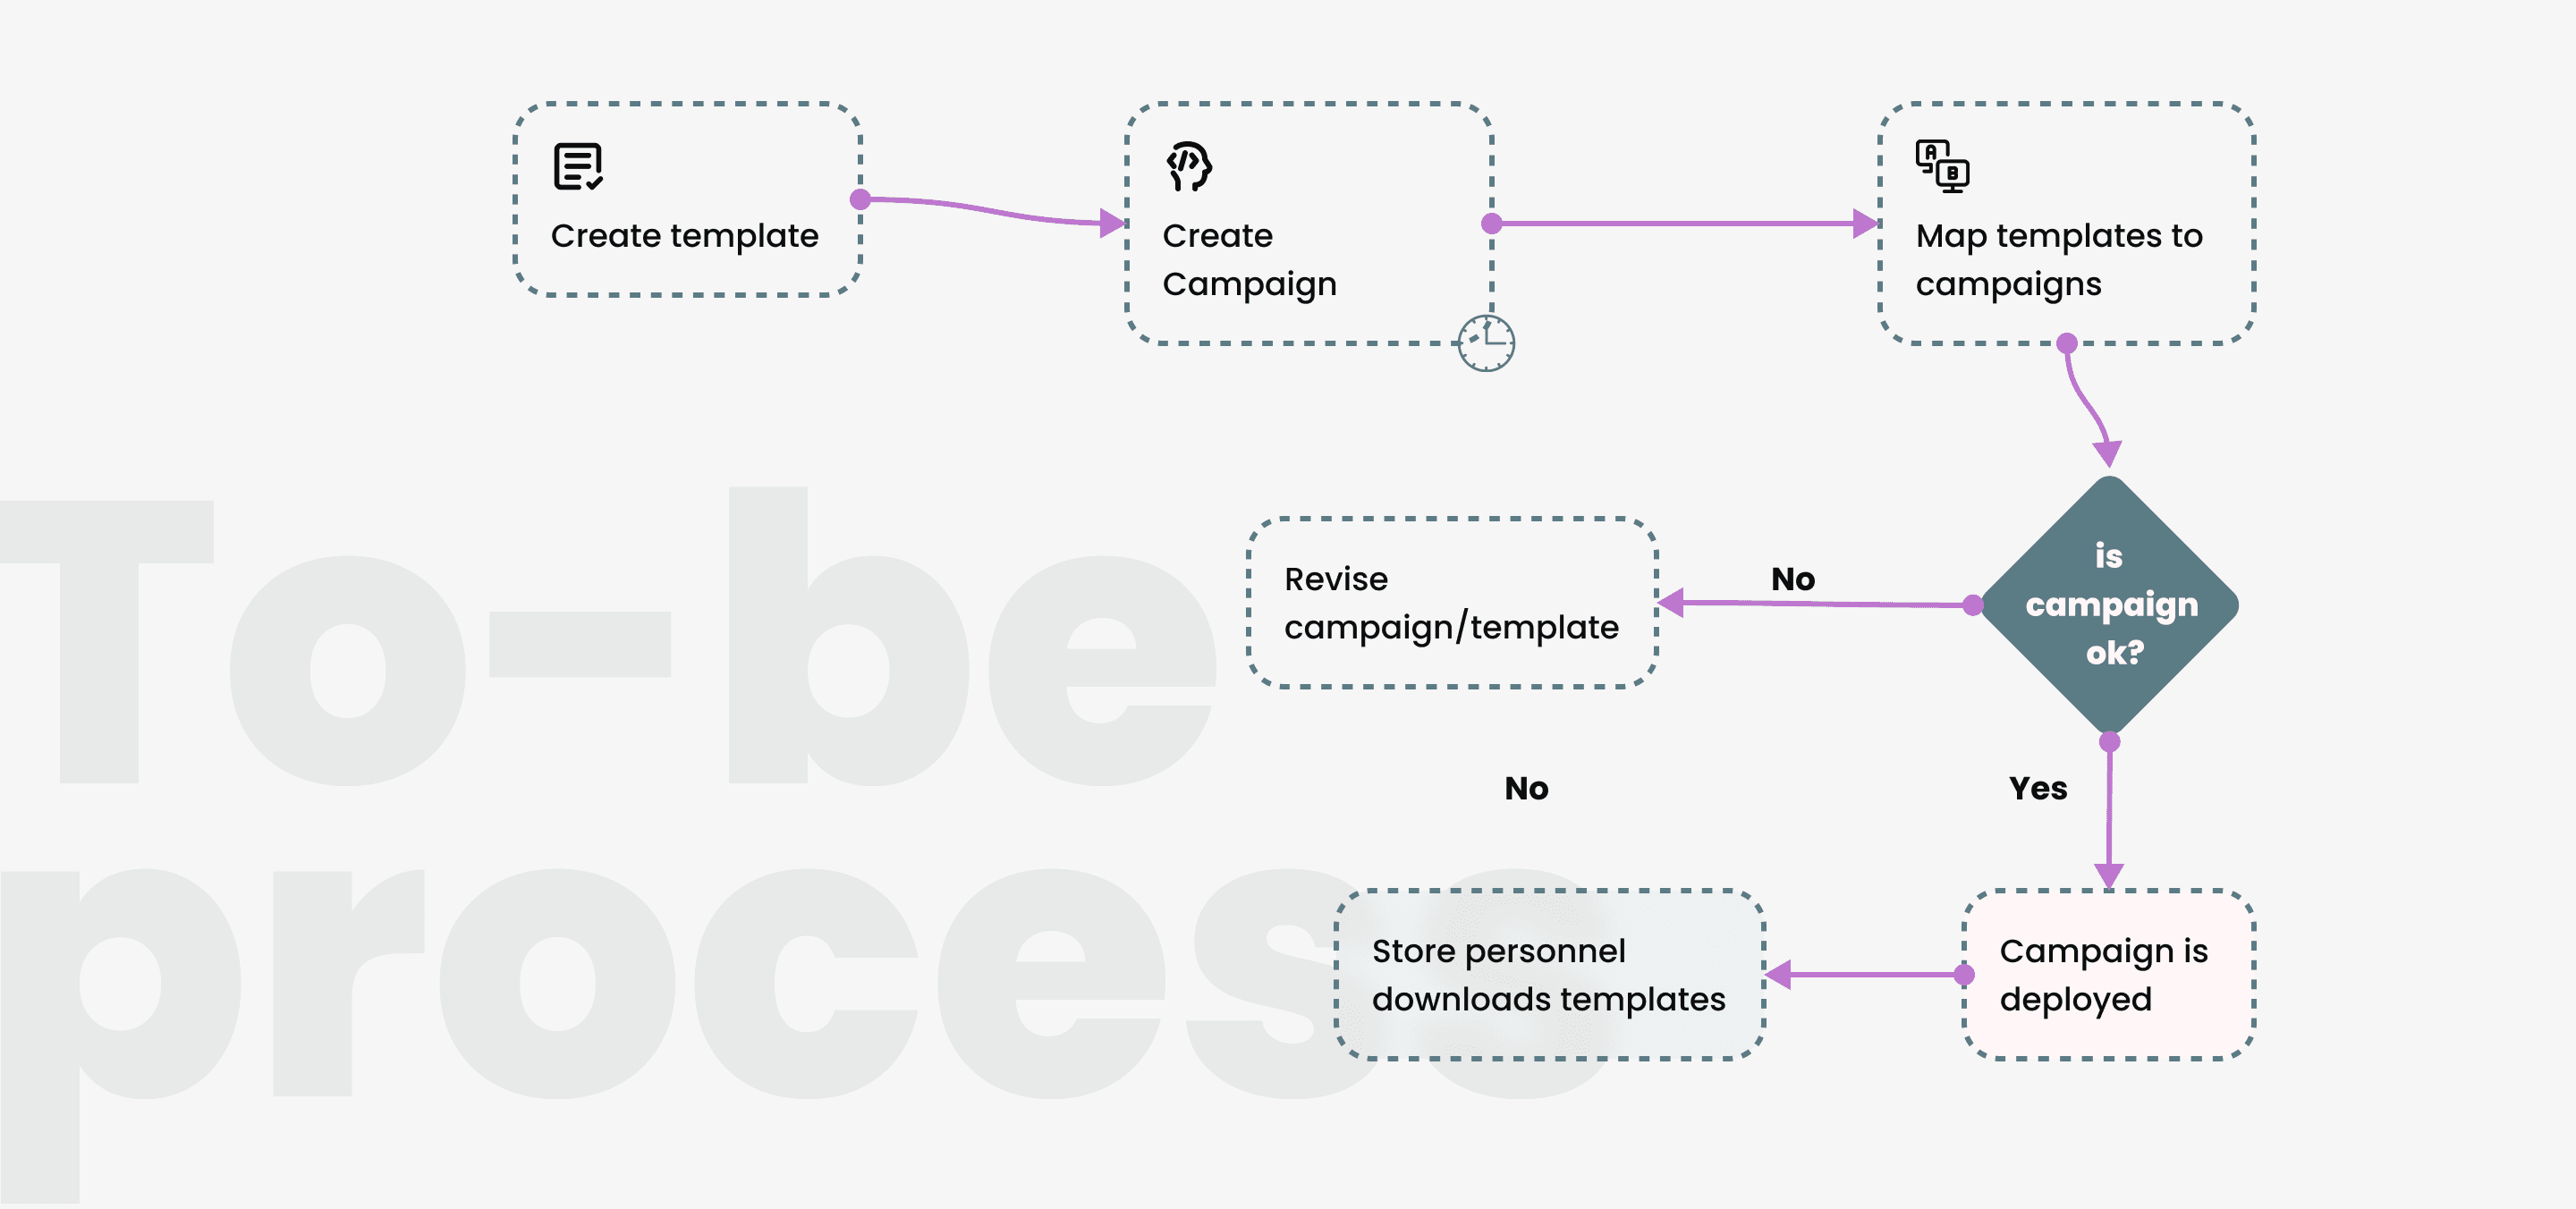
Creation of templates is multi-staged process that involves heavy reliance on frontend IT team to create them. This leads to longer TAT to go-live and increased feedback loops and coordination, lack of agility. This often results due to a lack of alignment between stakeholders and hence loss of efficiency and time and non coherent templates.
Creation of templates is multi-staged process that involves heavy reliance on frontend IT team to create them. This leads to longer TAT to go-live and increased feedback loops and coordination, lack of agility. This often results due to a lack of alignment between stakeholders and hence loss of efficiency and time and non coherent templates.
Outcomes
Outcomes
The JioFiber team was able to create, activate and download campaign materials with 0 friction and full autonomy over the end-to-end process.
The JioFiber team was able to create, activate and download campaign materials with 0 friction and full autonomy over the end-to-end process.

TAT to go-live was reduced by 80%. Feedback loop significantly decreased due to zero reliance on tech team. Brand guidelines were perfectly executed to 1MN+ channel partners pan India.
TAT to go-live was reduced by 80%. Feedback loop significantly decreased due to zero reliance on tech team. Brand guidelines were perfectly executed to 1MN+ channel partners pan India.
Introduced checker and maker seamlessly. Now creation and approval is undertaken & maintained with ease.
Introduced checker and maker seamlessly. Now creation and approval is undertaken & maintained with ease.

Flexibility for customisation of meta fields and realtime preview of changes.
Flexibility for customisation of meta fields and realtime preview of changes.
My Work
Contextual inquiry
Contextual inquiry
Workshops with
stakeholders
Workshops with
stakeholders
Research
Research
Information
architecture
Information
architecture
Design system & Interaction
framework
Contextual Inquiry
Contextual Inquiry
With JioFiber team along with the Product manager i conducted workshops wherein i was able to form an understanding of the as-is process end to end for the creation of templates.
With JioFiber team along with the Product manager i conducted workshops wherein i was able to form an understanding of the as-is process end to end for the creation of templates.
My aim with contextual inquiry was to:
My aim with contextual inquiry was to:
Understand the existing process end-to-end to fully grasp the project scope in detail.
Define and configure system objects to enable a fully automated, developer-independent workflow.
Understand the existing process end-to-end to fully grasp the project scope in detail.
Define and configure system objects to enable a fully automated, developer-independent workflow.

Primary Research
Primary Research
My contextual inquiry led me to understand the process end to end thereby also leading me to first explore the existing client portal where the templates were deployed. These templates were directly created by frontend team.
My contextual inquiry led me to understand the process end to end thereby also leading me to first explore the existing client portal where the templates were deployed. These templates were directly created by frontend team.

Initial discussions led me to create sketches of organising information and chunking of different tasks that may constitute of creating to publishing various templates. I used KJ technique to find common themes. Five major themes emerged:
Form customisation- Ability to create custom fields for information input into a template and template itself- meta fields creation
Link template to campaigns- Ability to create campaigns and map templates to them
Maker checker concept - Implement approval process of campaigns
Designate roles and privileges
Clear feedback and states for campaigns
Prototype
User
Research
Prototype
Exploration - Making the UI topology choice
Exploration - Making the UI topology choice
Initial discussions led me to create sketches of organising information and chunking of different tasks that may constitute of creating to publishing various templates.
Initial discussions led me to create sketches of organising information and chunking of different tasks that may constitute of creating to publishing various templates.
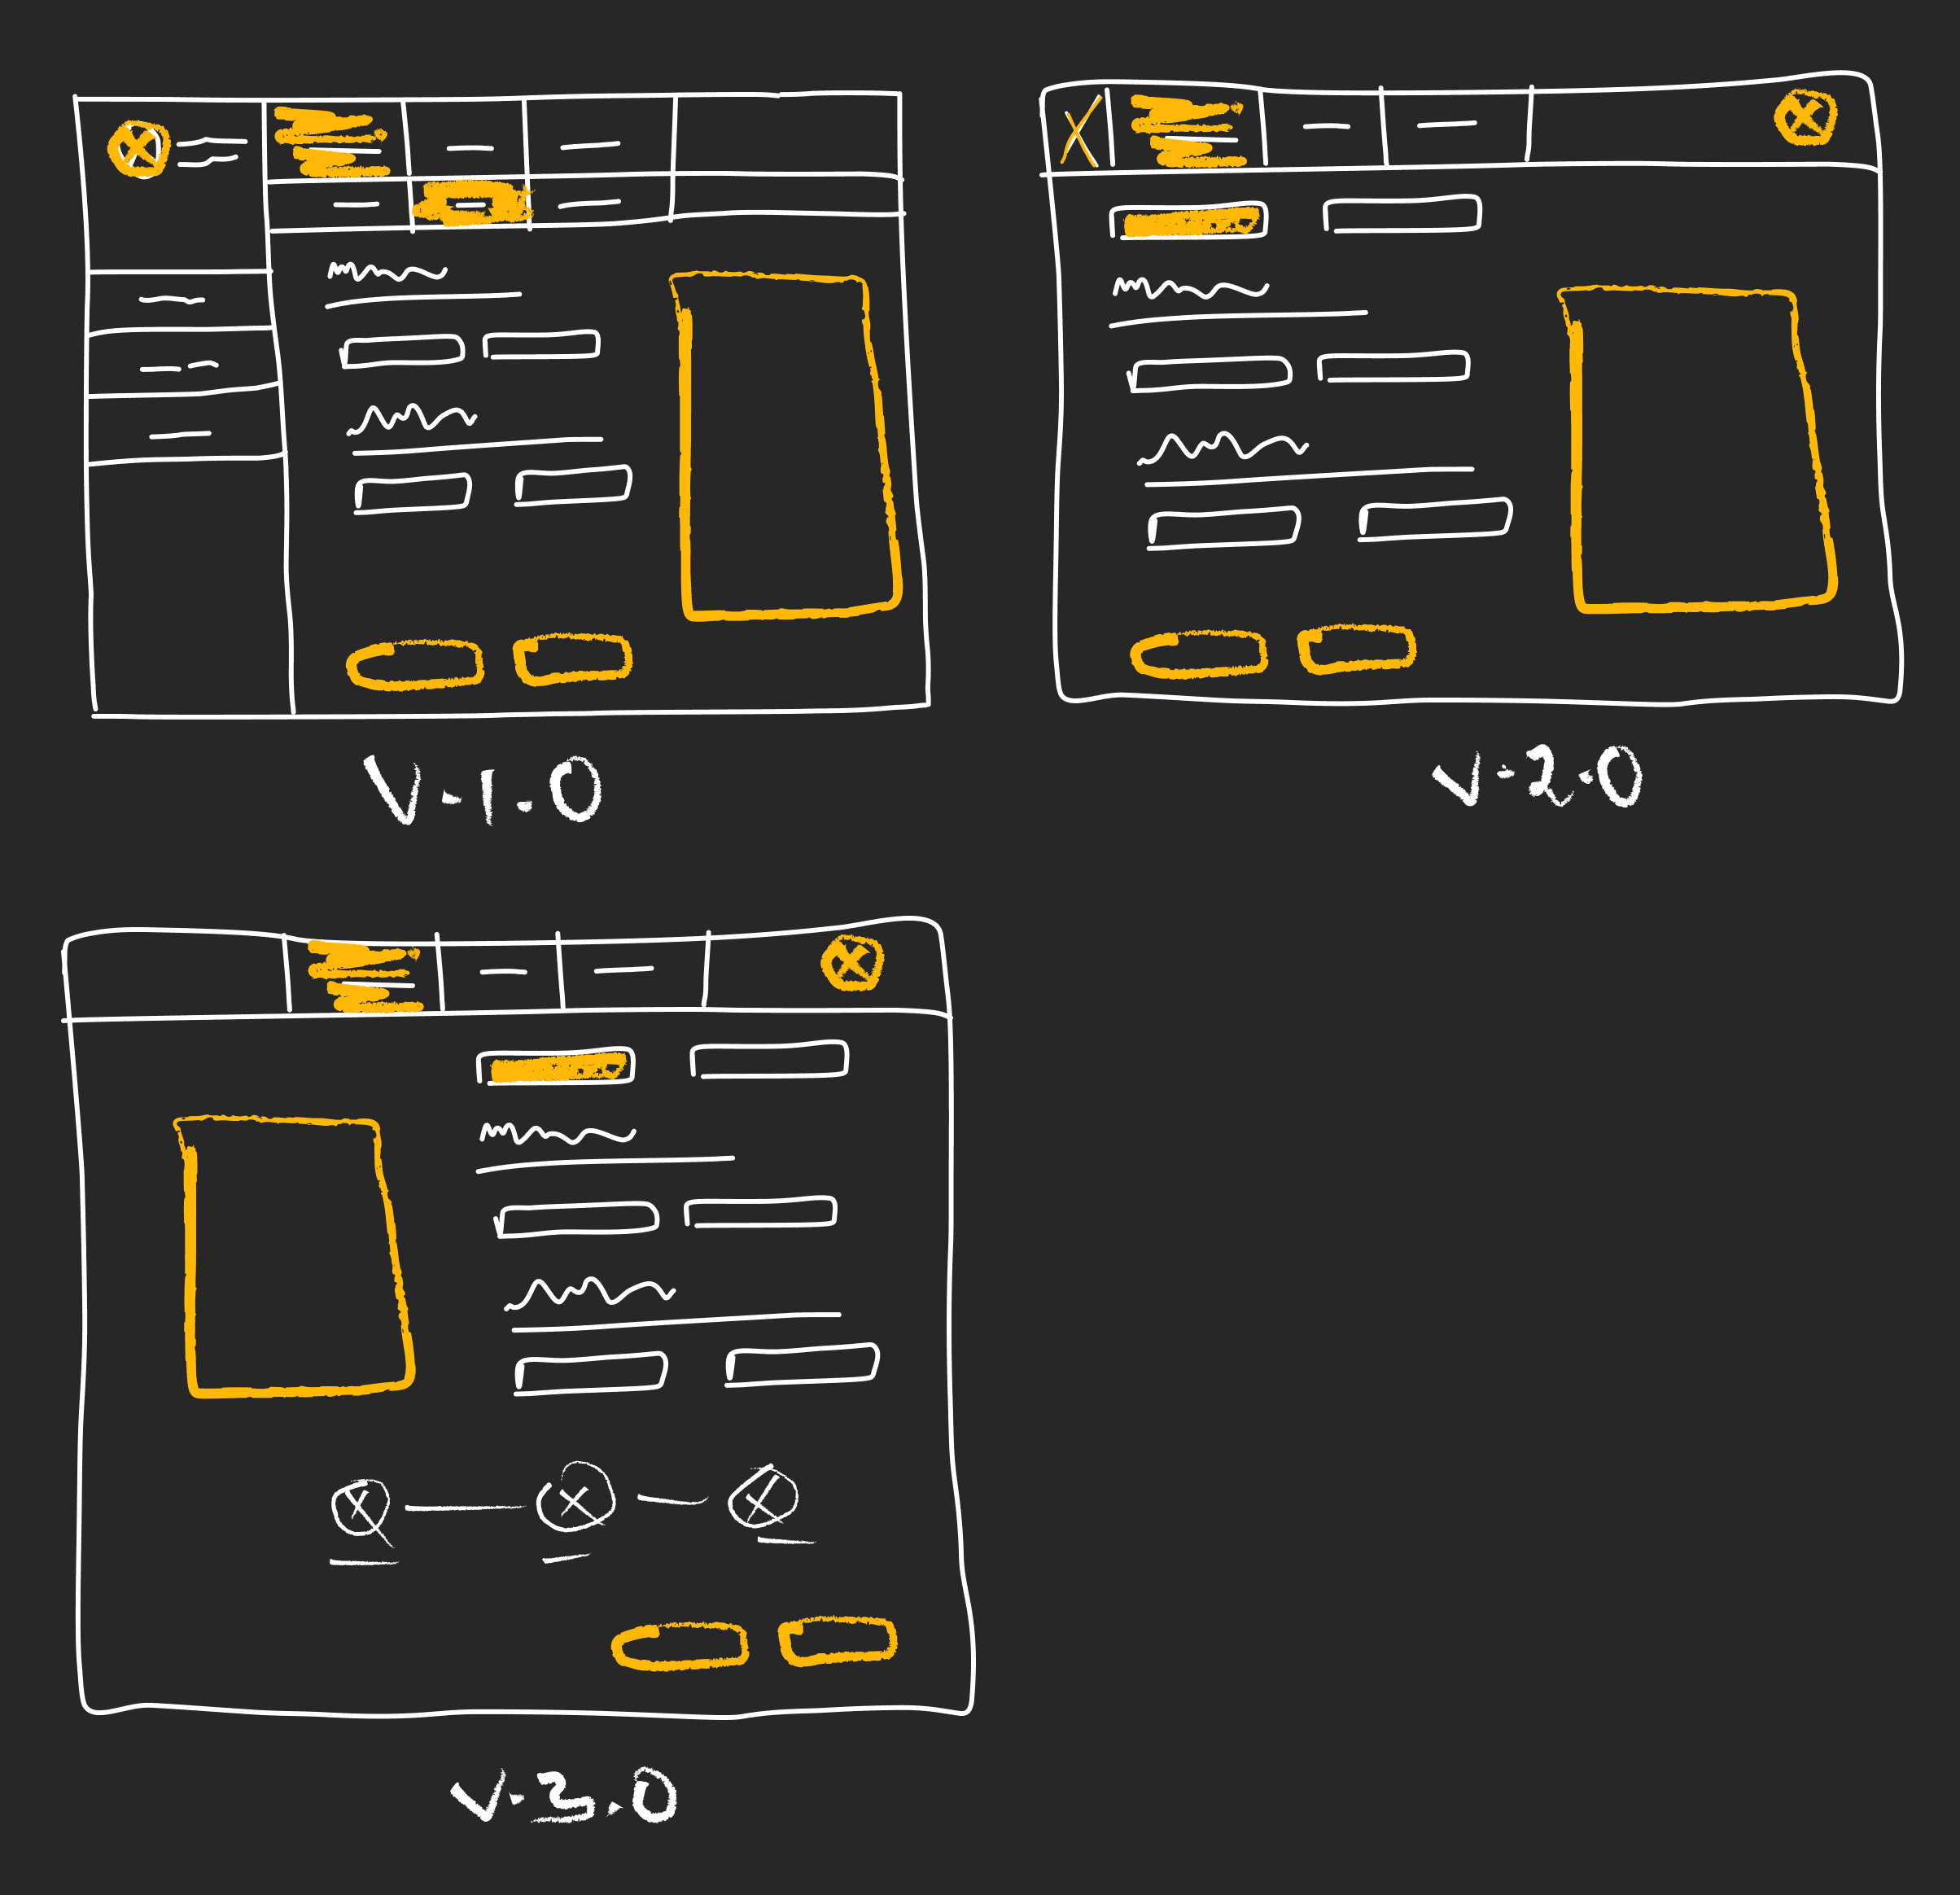
After evaluating the layout requirements, we aligned on the V2.0. Reasons being-
Its cleaner structure preserves visual hierarchy and reduces cognitive load—critical for a screen that can quickly become information-dense.
We also intentionally avoided introducing a left-side global navigation: with only two top-level actions at this stage, consolidating them in the header maintains clarity without adding unnecessary interface weight.
Designs
Designs
Designs
Conceptualisation
Conceptualisation
Initial discussions and using KJ technique led me to create sketches of organising information and chunking of different tasks that may constitute of creating to publishing various templates.
We identified and implemented the mental model user inherently performs to complete their tasks. User needs to provide necessary info of their details over a poster or image. They should be able to display their necessary information over the image.
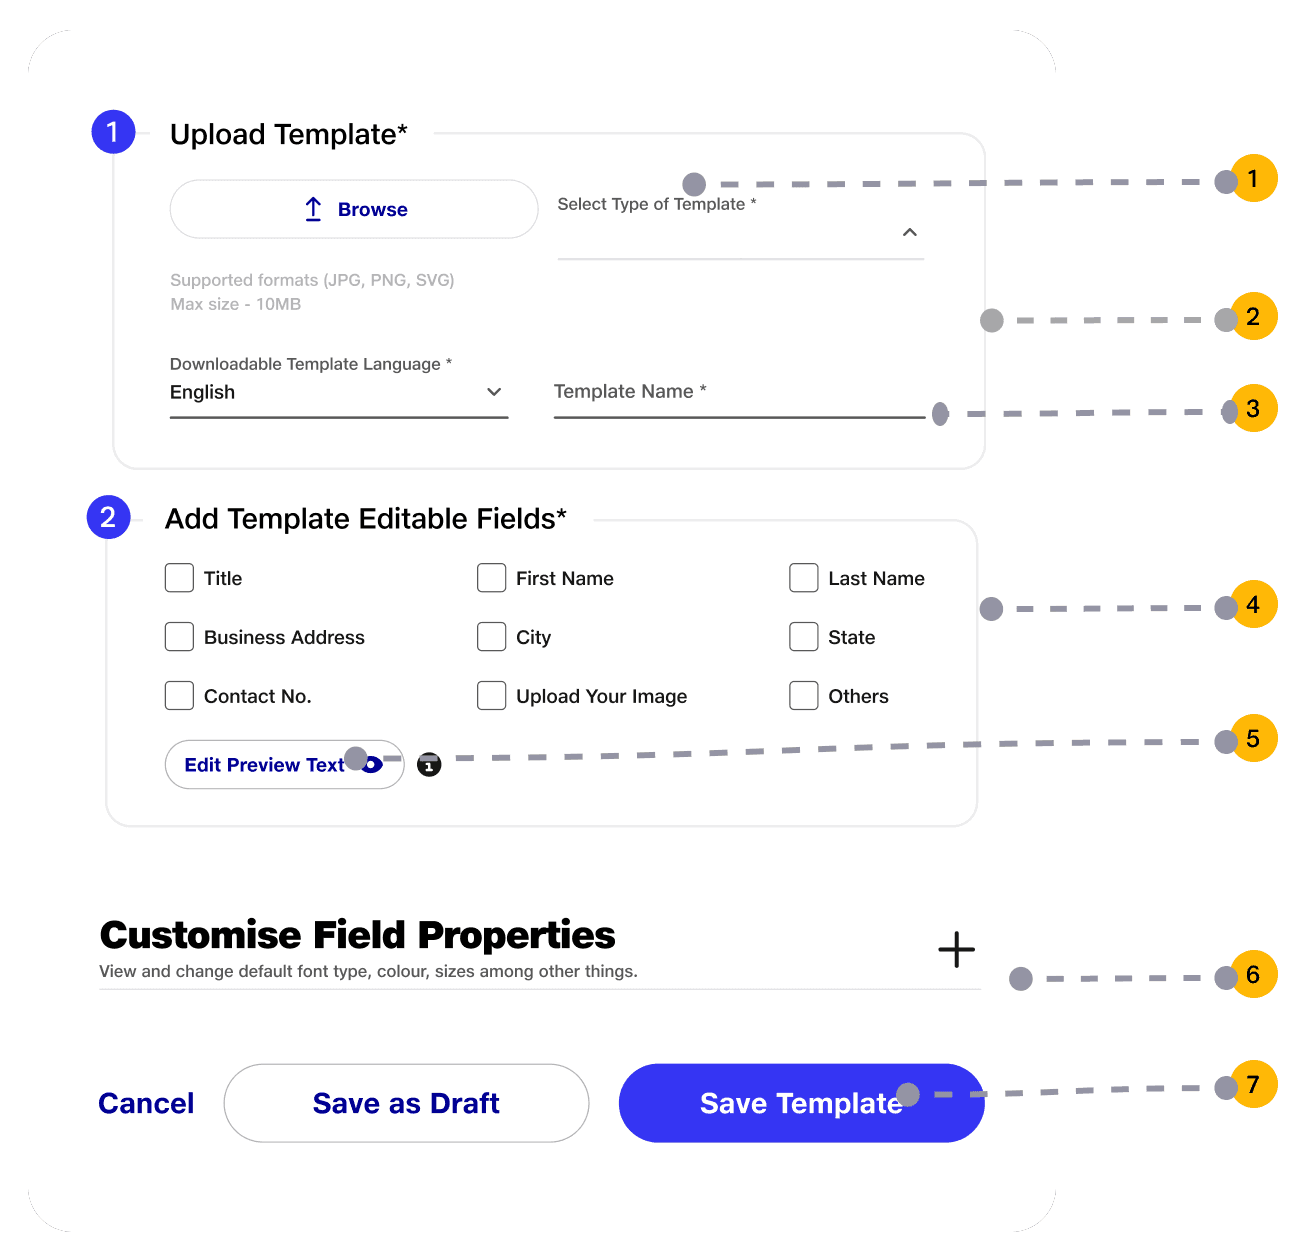
Template Creation UI
Template Creation UI
1
1
1
As the process is initiated with marketing collaterals shared by the marketing team. Creation of template starts with uploading of the raw image file.
As the process is initiated with marketing collaterals shared by the marketing team. Creation of template starts with uploading of the raw image file.
2
After successful upload - meta fields can be added to the image. Fields can then be placed freely anywhere in the image. On successful upload also a preview image in side panel to be displayed for feedback.
After successful upload - meta fields can be added to the image. Fields can then be placed freely anywhere in the image. On successful upload also a preview image in side panel to be displayed for feedback.
3
Placeholder text can be then previewed for providing easier comprehension for users downstream(store personnels).
Placeholder text can be then previewed for providing easier comprehension for users downstream(store personnels).
4
User can select required meta fields for template. Some of them are preselected to reduce cognitive load.
User can select required meta fields for template. Some of them are preselected to reduce cognitive load.
5
User can view fields placeholder to modify dummy titles or names (Eg. John Doe)
User can view fields placeholder to modify dummy titles or names (Eg. John Doe)
6
User can view fields placeholder to modify dummy titles or names (Eg. John Doe)
User can view fields placeholder to modify dummy titles or names (Eg. John Doe)
7
User can view fields placeholder to modify dummy titles or names (Eg. John Doe)
User can view fields placeholder to modify dummy titles or names (Eg. John Doe)
Template Creation Page
Template Creation Page
User can validate all the metafields and preview fields over the poster.
Customise field properties helps to adjust typeface properties like font, size, color.
User can validate all the metafields and preview fields over the poster.
Customise field properties helps to adjust typeface properties like font, size, color.
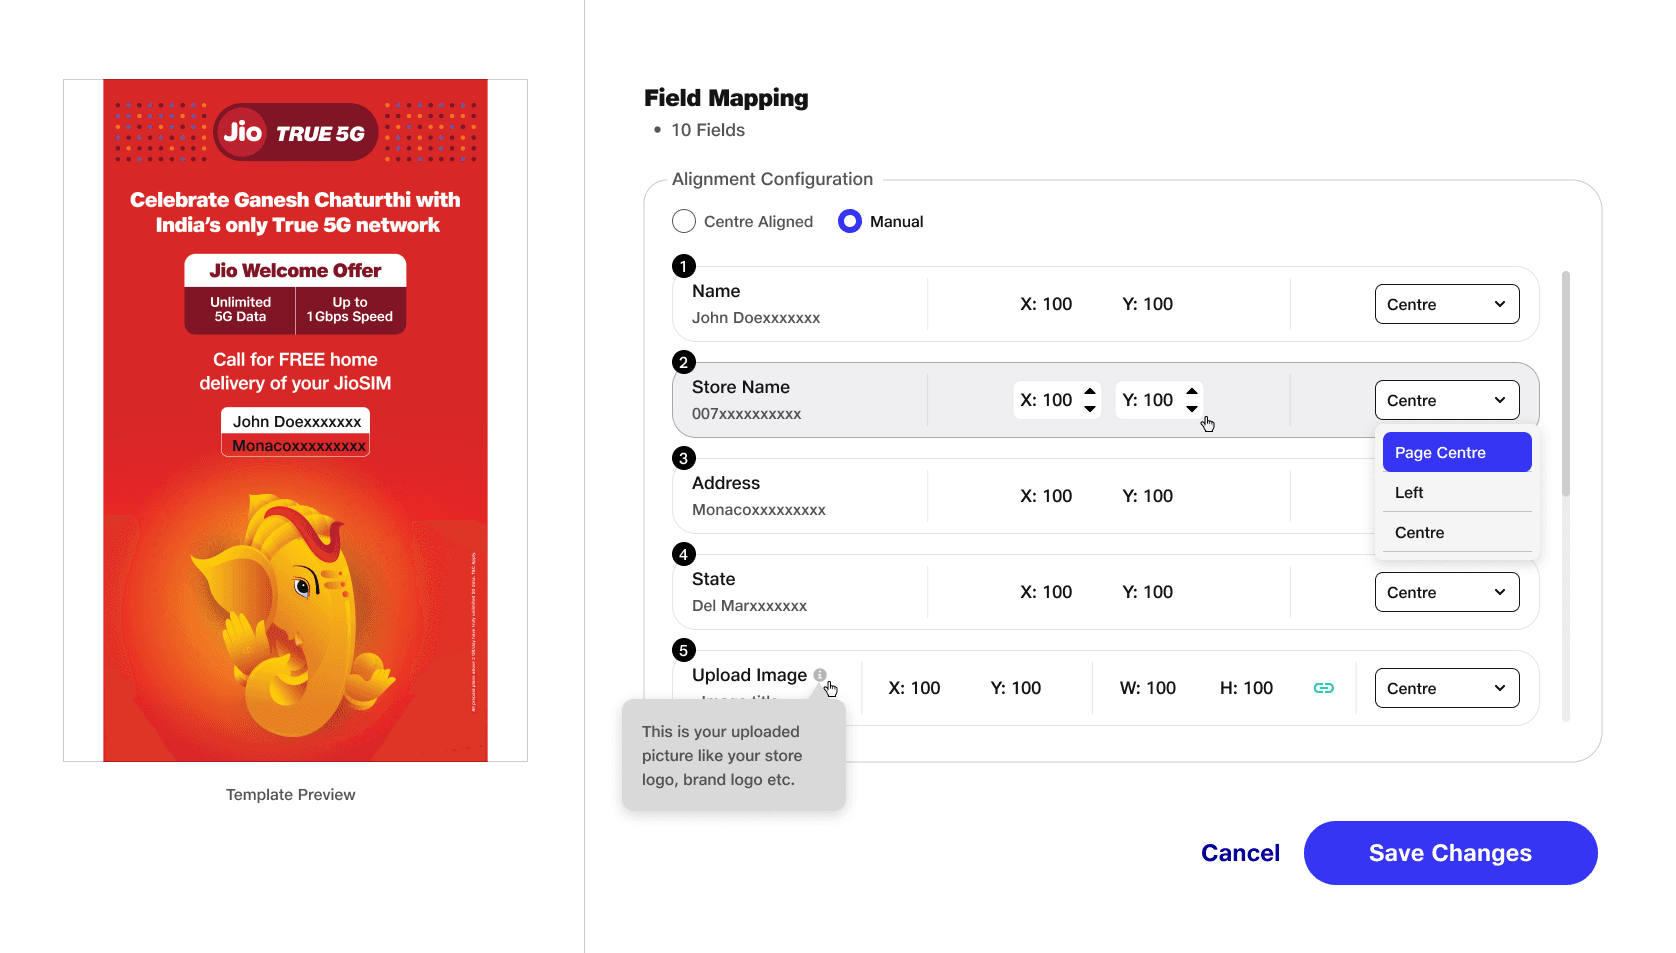
Edit Preview Text
Edit Preview Text
Here user can set position of the meta fields through the coordinate system.
Dummy text holders can be changed and saved to be reflected during preview.
Here user can set position of the meta fields through the coordinate system.
Dummy text holders can be changed and saved to be reflected during preview.
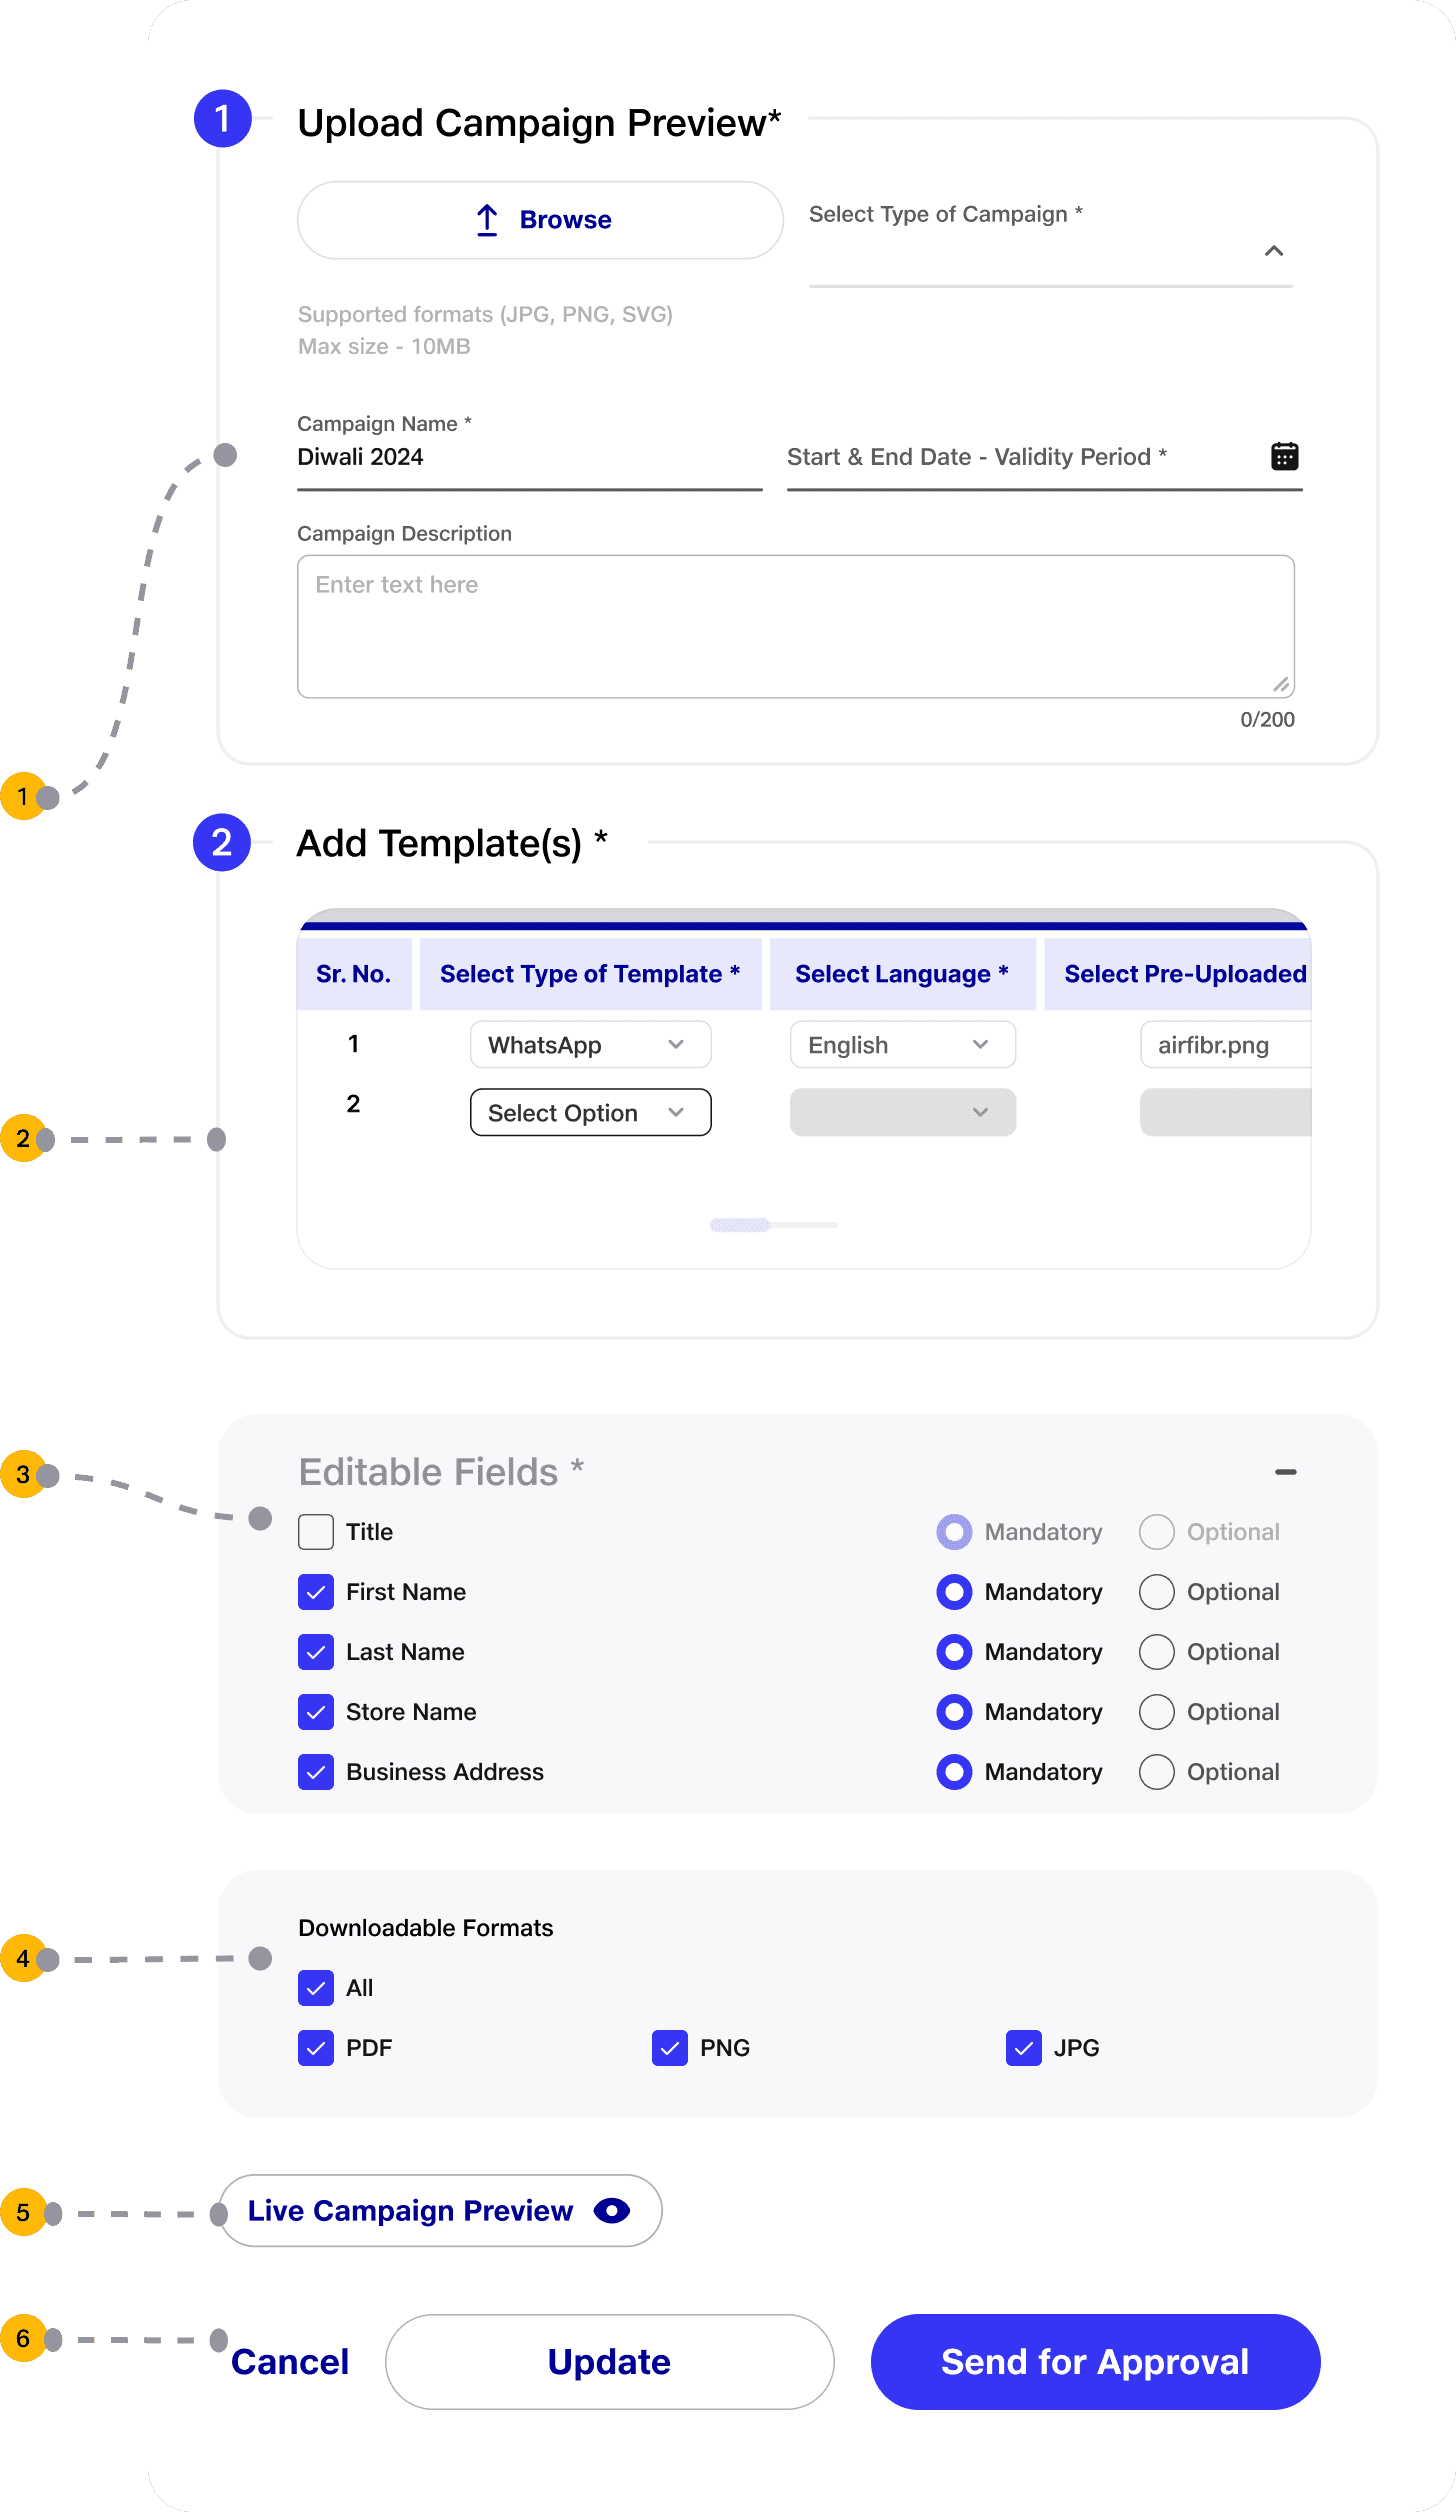
Campaign Creation UI
Campaign Creation UI
After template(s) has been created, campaigns can be created and allow its mapping to respective templates. Technically, any one template can be mapped to multiple campaigns. On multiple iterations we refined to following tasks.
After template(s) has been created, campaigns can be created and allow its mapping to respective templates. Technically, any one template can be mapped to multiple campaigns. On multiple iterations we refined to following tasks.
1
Campaign Details:
Type: Select or create a category (e.g., AirFiber, Festive).
Name: Enter a unique campaign name.
Validity: Set start and end dates.
Description: Optional brief campaign summary.
Campaign Details:
Type: Select or create a category (e.g., AirFiber, Festive).
Name: Enter a unique campaign name.
Validity: Set start and end dates.
Description: Optional brief campaign summary.
2
Template Mapping:
Select Template Type, Language, and Pre-uploaded Template.
Add multiple templates if needed.
Template Mapping:
Select Template Type, Language, and Pre-uploaded Template.
Add multiple templates if needed.
3
Editable Fields: Customize mandatory and optional fields.
Editable Fields: Customize mandatory and optional fields.
4
Edit Page Settings:
Choose Template Type, Language, and Name.
Define downloadable formats (PDF, PNG, JPG).
Edit Page Settings:
Choose Template Type, Language, and Name.
Define downloadable formats (PDF, PNG, JPG).
5
Live Preview: Opens a new tab thats displayed like that in the client portal that replicates same user experience.
Live Preview: Opens a new tab thats displayed like that in the client portal that replicates same user experience.
6
Save/Submit:
Save as Draft for later edits.
Submit for Approval (confirmation message displayed).
Save/Submit:
Save as Draft for later edits.
Submit for Approval (confirmation message displayed).
Campaign Creation Page
Campaign Creation Page
User can validate all the metafields and preview fields over the poster.
Customise field properties helps to adjust typeface properties like font, size, color.
User can validate all the metafields and preview fields over the poster.
Customise field properties helps to adjust typeface properties like font, size, color.

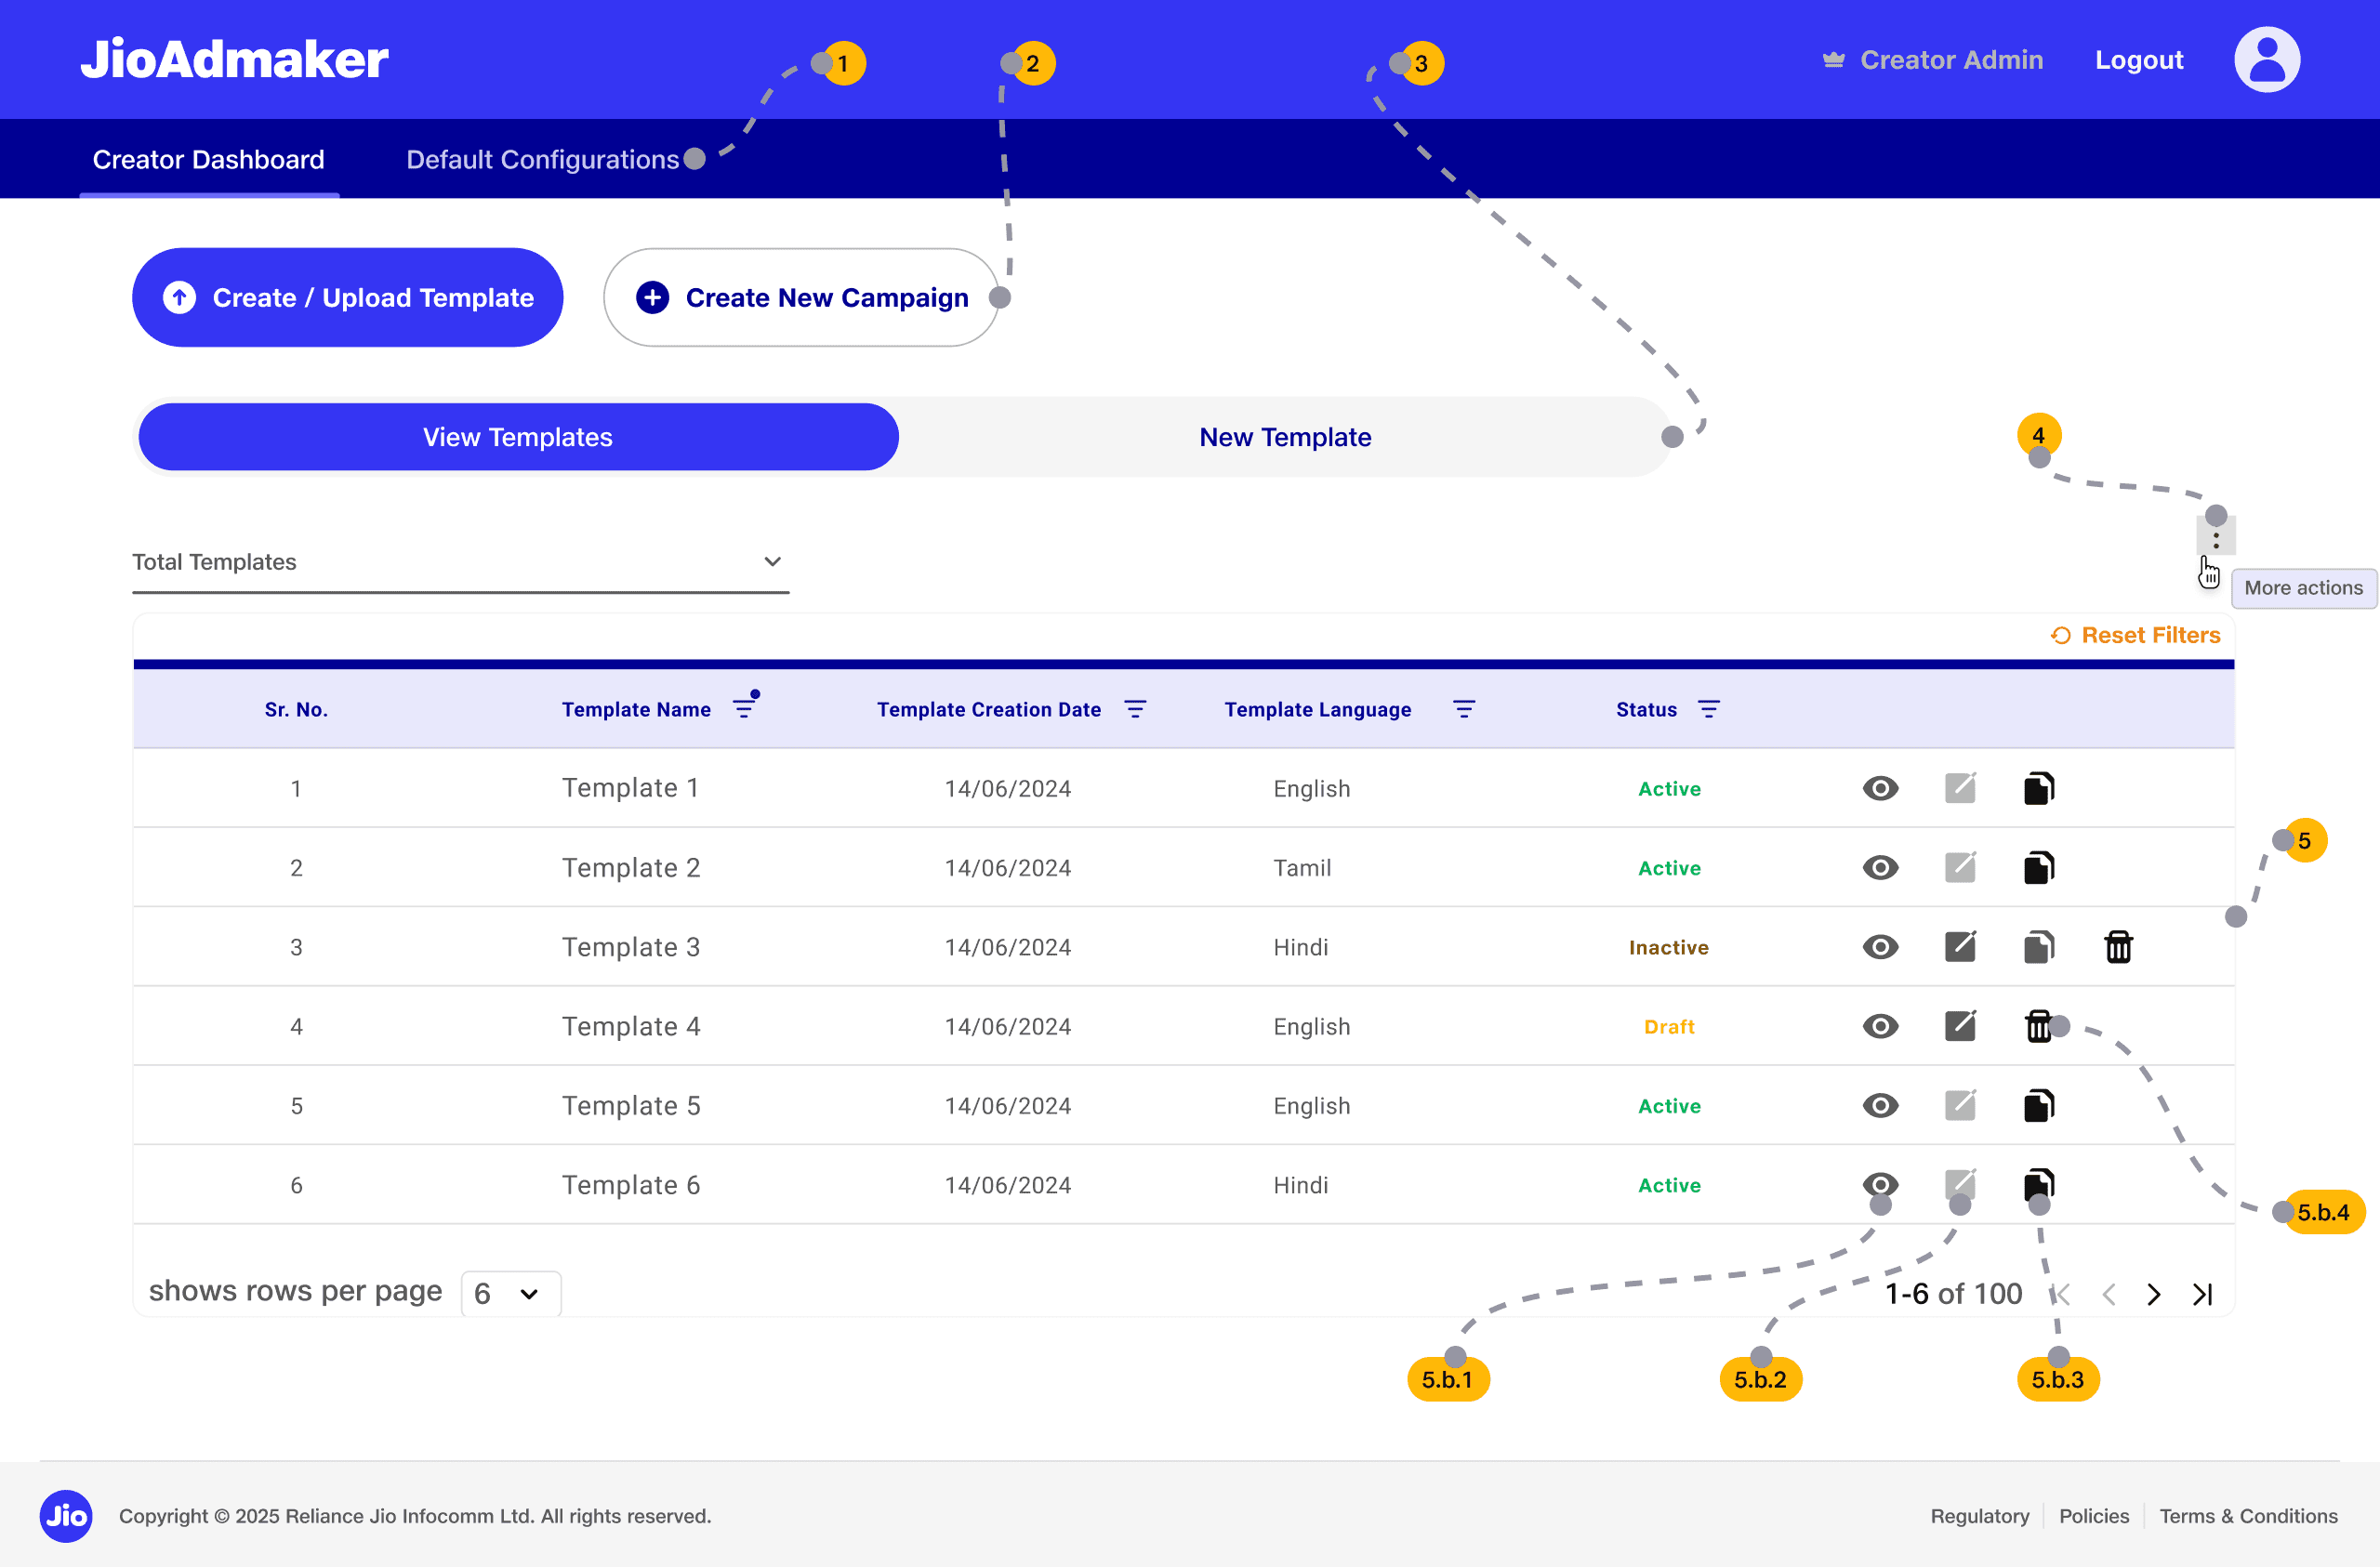
Viewing Templates UI
Viewing Templates UI
1
Under the global navigation tab, two main navigational tabs allow users to toggle between the Creator Dashboard (the current view) and Default Configurations.
Under the global navigation tab, two main navigational tabs allow users to toggle between the Creator Dashboard (the current view) and Default Configurations.
2
Template & Campaign Creation: Two prominent buttons, "Create / Upload Template" and "Create New Campaign," serve as the primary entry points for new projects.
Template & Campaign Creation: Two prominent buttons, "Create / Upload Template" and "Create New Campaign," serve as the primary entry points for new projects.
3
A secondary toggle bar allows users to switch between View Campaigns (active) and a simplified Create New Campaign view. Under this tab, we had to take into account the primary task the users shall be performing. Initial version had “Create” forms on the left but later revised on keeping at right. The primary reason to do this was that users will reuse the same templates and will do a preliminary check before mapping it to any campaign. And they shall use the view table frequently hence “Create” tabs was placed on right, as this is one time activity.
A secondary toggle bar allows users to switch between View Campaigns (active) and a simplified Create New Campaign view. Under this tab, we had to take into account the primary task the users shall be performing. Initial version had “Create” forms on the left but later revised on keeping at right. The primary reason to do this was that users will reuse the same templates and will do a preliminary check before mapping it to any campaign. And they shall use the view table frequently hence “Create” tabs was placed on right, as this is one time activity.
4
To keep the workspace clean and efficient, we’ve implemented a kebab menu that houses essential tools like template management and data exporting. This 'Action Hub' is designed to adapt with you, allowing us to add more powerful automation tools in the future without complicating the view. This design choice ensures the interface remains uncluttered while providing a scalable framework to house future advanced features as the platform grows.
To keep the workspace clean and efficient, we’ve implemented a kebab menu that houses essential tools like template management and data exporting. This 'Action Hub' is designed to adapt with you, allowing us to add more powerful automation tools in the future without complicating the view. This design choice ensures the interface remains uncluttered while providing a scalable framework to house future advanced features as the platform grows.
5
Template Management Table:
This is the core functional area where users interact with existing data.
Search & Filtering: A dedicated search bar and a Filters button allow users to narrow down long lists of campaigns by specific criteria.
Bulk Actions: A dropdown menu enables users to perform actions (like "Withdraw" or "Delete") on multiple selected campaigns simultaneously.
Actions:
Preview: View template details.
Edit: Modify Draft/Inactive templates.
Duplicate: Copy an existing template.
Delete: Remove the template created.
Viewing Campaign UI
Viewing Campaign UI
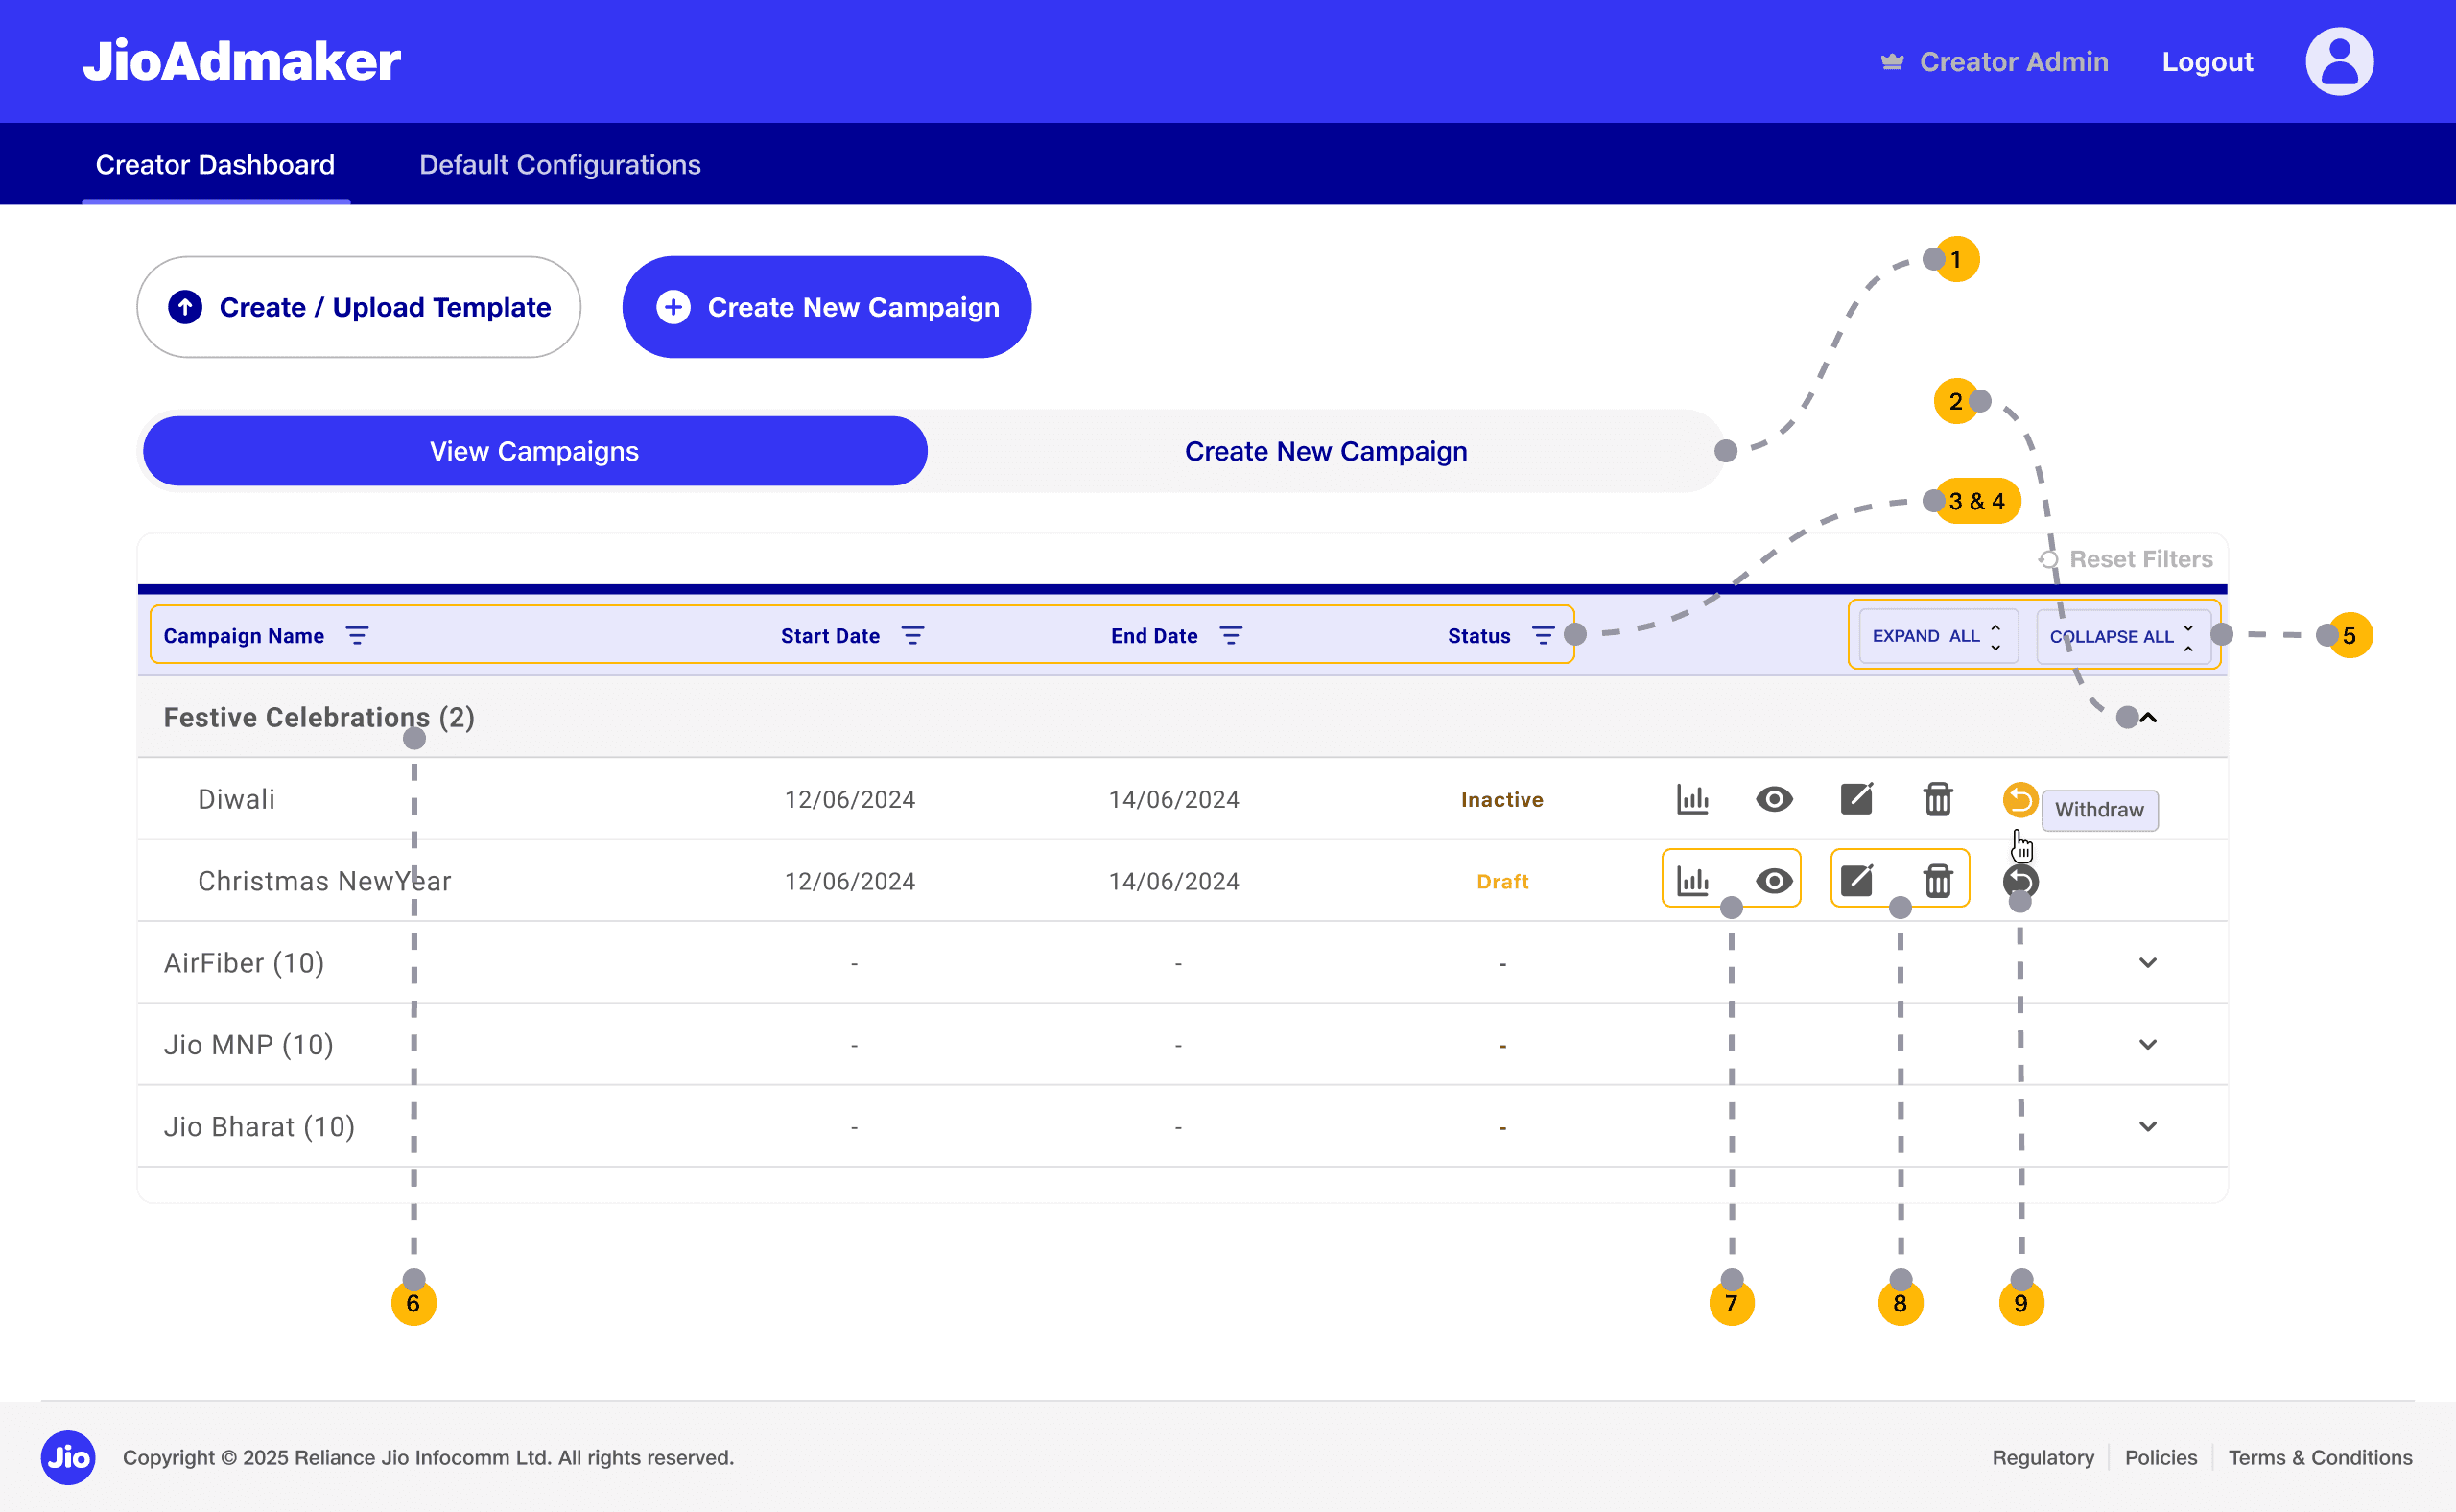
1
Contextual Access: Users access this primary workspace via the "View Campaigns" toggle on the Creator Dashboard.
Contextual Access: Users access this primary workspace via the "View Campaigns" toggle on the Creator Dashboard.
2
Flat & Nested Hierarchy: Employs an Accordion-style layout to manage parent-child relationships, allowing multiple templates to be mapped under a single campaign header (e.g., "Festive Celebrations") without cluttering the view.
Flat & Nested Hierarchy: Employs an Accordion-style layout to manage parent-child relationships, allowing multiple templates to be mapped under a single campaign header (e.g., "Festive Celebrations") without cluttering the view.
3
Key Data Attributes: Provides high-density visibility for Campaign Name, Start/End Dates, and Lifecycle Status (Draft, Pending, Active, Inactive, Expired).
Key Data Attributes: Provides high-density visibility for Campaign Name, Start/End Dates, and Lifecycle Status (Draft, Pending, Active, Inactive, Expired).
4
Multi-Variant Filtering: Supports rapid sorting and filtering by Name, Status, and Temporal Data (dates) to handle high-volume campaign lists.
Multi-Variant Filtering: Supports rapid sorting and filtering by Name, Status, and Temporal Data (dates) to handle high-volume campaign lists.
5
Global Expand/Collapse: Includes "Expand All" and "Collapse All" triggers to allow users to toggle between a high-level bird's-eye view and granular template details instantly.
Global Expand/Collapse: Includes "Expand All" and "Collapse All" triggers to allow users to toggle between a high-level bird's-eye view and granular template details instantly.
6
Sub-campaign counter: Displays the total number of sub-campaigns mapped, providing quick visual feedback at a glance.
Sub-campaign counter: Displays the total number of sub-campaigns mapped, providing quick visual feedback at a glance.
7
Live Preview & Status Tracking: Integrated icons allow for immediate Simulated Flow (viewing the user journey) and Tracking (Status Log).
Live Preview & Status Tracking: Integrated icons allow for immediate Simulated Flow (viewing the user journey) and Tracking (Status Log).
8
Lifecycle Management: Standard Edit and Delete functions are present but contextually gated—only available for Draft or Rejected states to prevent accidental data corruption of live campaigns.
Lifecycle Management: Standard Edit and Delete functions are present but contextually gated—only available for Draft or Rejected states to prevent accidental data corruption of live campaigns.
9
Error Recovery (Withdraw Action): A specialized "Withdraw" function enables users to intercept a campaign during the Approval/Review stage.
UX Impact: This serves as a critical "undo" state, allowing users to recover from mistakes or make on-the-fly edits without waiting for a formal rejection cycle, directly returning the item to the user's "Draft" bucket.